Server Installation Guide
Execute install-media.exe to extract the installation files.
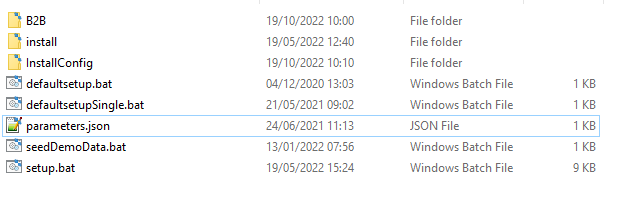
The result of the extraction is the folder install-media :
Parameters
To install run the setup.bat from a command prompt in administrator mode. Setup.bat takes 1 optional parameter:
Important!
When running the setup it’s important that you open the command prompt in Administrator mode exactly like shown below:

- %PARAM%: Path to a parameter file that contains the settings for your specific installation. If the parameter is omitted, the default
parameters.jsonis used.
Example:
> setup to perform a totally default or according to parameters.json installation, or
> setup "c:\ParameterFiles\http_parameters.json" to install the system with your own parameter file, that in this example could include a “protocol”:”http” setting.
Install user
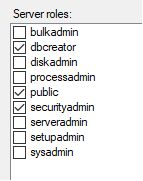
The user account installing, whether it’s a SQL account or an AD account, needs to have the dbcreator and securityadmin roles on the SQL server:
Note
When running the setup it’s always a good idea to include
2> setupErrors.logas a last parameter, which in case of errors in the installation, writes the errors to the file “setupErrors.log”.Example:
>> setup 2> setupErrors.logor
>> setup "some_parameters.json" 2> setupErrors.logRun
defaultSetup.batto run the installation with the defaultparameters.jsonand automatically write errors to setupErrors.log
The installation package includes a parameters.json file with default servername and installation path suitable for a single-user installation to a local harddisk and a local Microsoft SQL Express server, but for a more advanced install, you must either edit the parameters.json file before comencing with installation or edit the different configuration files after the setup script has finished.
Databases
The following databases are created during a default installation:
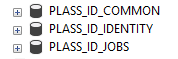
- PLASS_ID_COMMON: Contains data related to all the business processes in the system.
- PLASS_ID_IDENTITY: Contains data related to user accounts and authorisation.
- PLASS_ID_JOBS: Contains data related to background processes like dental and dna matching.
You may change the name of the databases by altering the parameters file before setup takes place
Websites
The following websites are created during installation:

-
api: Hosts the REST interface to the database.
In the default configuration api is bound to the address: https://api.dviserver.local
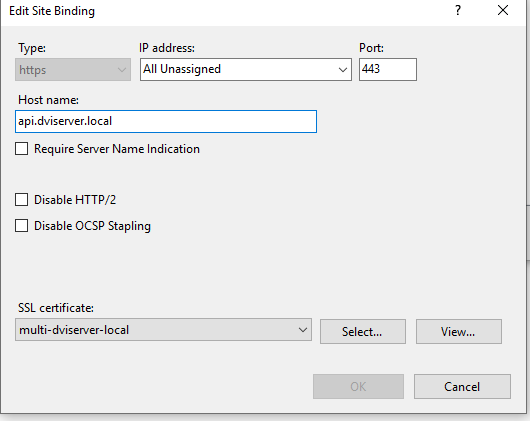
and is bound to the certificate multi-dviserver-local. -
ids: Hosts the Identity Server interface.
In the default configuration ids is bound to the address: https://ids.dviserver.local
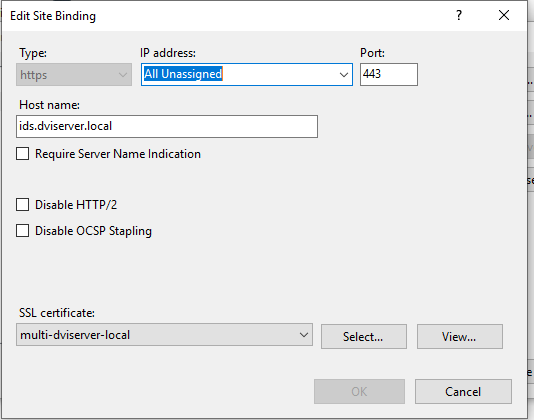
and is bound to the certificate multi-dviserver-local. -
client: Hosts the UI interface. In the default configuration client is bound to the address: https://dviserver.local
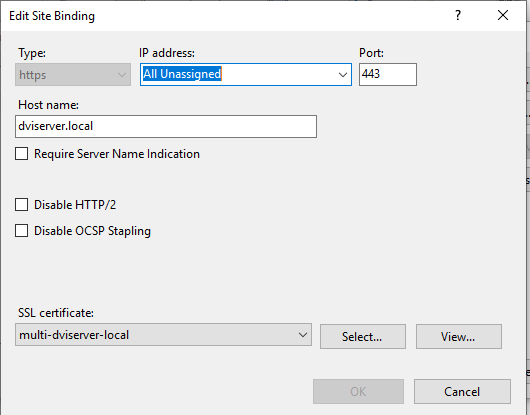
and is bound to the certificate multi-dviserver-local.
System files
In the c:\Windows\System32\Drivers\etc\hosts file, the following lines are added:
127.0.0.1 api.dviserver.local
127.0.0.1 ids.dviserver.local
127.0.0.1 dviserver.local
which makes it possible to access the system from a browser on the server starting with: https://dviserver.local
To make the system available for users on other clients, you have to ask your network managers to make your own DNS configuration and bind your own SSL certificate(s) to the sites using IIS Admin.
Config files
See full description of the Config files
This section is only relevant if you need to change the system configuration after install.
1.1 Angular client
1.2 web.config
1.3 Api data server
1.4 Identity server
Note
During installation, due to install of several prerequisite services, you might be asked to reboot the server to continue the installation.

After installation
The installation is leaving the system without any organizational data. Before system can be handed over to users, a System Initialization should take place.